Cream-Braised Brussels Sprouts

I came across this recipe after Genesis had been sautéing brussels sprouts for weeks and I wanted something new. I am not sure if this is an endorsement for anyone else but when Gen first had this he LOVED them and then asked me what kind of cheese I used on them (none… there was none… he is strange). I have had to alter the recipe to suite my needs/ items on hand. Initially I used fresh sprouts, then they became difficult to source (at least good ones were difficult to hunt down) so I started using frozen sprouts, and voila, works both ways! I have also swapped out the lemon juice for lime in a pinch. These brussels sprouts are lightly caramelized, creamy, rich, and the perfect side (or plateful). I am proud to say that my mom has called me a number of times asking for MY help with these, my parents love them! The recipe is from this lovely blog, Orangette, and it will be a recipe in my family forever.

Cream-Braised Brussels Sprouts

From here.

Ingredients

  • 1 ¼ lb brussels sprouts (about 5-6 cups… they take up a lot of space)
  • 3 tbsp butter
  • ¼ tsp coarse sea salt, plus more to taste
  • 1 cup heavy cream (more if needed to cover)
  • 1 tbsp fresh lemon juice, or more to taste

Directions

  1. First, prep the brussels sprouts. Trim the stem end of each sprout and pull off any ragged or nasty outer leaves. Cut the sprouts in half from stem end to tip. If using frozen sprouts, you wont cut them, they’ll caramelize well enough whole, and still be delicious.

    Brussels all cut, and ready to caramelize.


  2. In a large skillet, melt the butter over medium-high heat. Add the brussels sprouts and salt. Cook, stirring occasionally, until the sprouts are nicely browned in spots, about 5 minutes or so. Don’t skip this step, this adds a rich depth of flavour that is nicely balanced by the cream and the lemon.
  3. Pour in the cream to just about cover the sprouts, stir to mix, and then cover the pot. Reduce the heat to low or medium low: you want to keep the pan at a slow simmer. Braise until the sprouts are tender enough to be pierced easily with the tip of a paring knife, about 20 minutes. The cream will have reduced some and will have taken on a creamy tan color.
  4. Remove the lid, and stir in the lemon juice. Taste for seasoning, and adjust as necessary. Let the pan simmer, uncovered, for a minute or two to thicken the cream to a glaze that loosely coats the sprouts. Serve immediately with steak, pork chops, tofurkey, anything you want!

    On their way.

Ukrainian Chicken Paprikash

Being one quarter Ukrainian, every once in awhile I get the urge to “get back to my roots” and cook up some delicious Ukrainian fare. As a non-mommy, it was a lot easier to commit the time needed to create the mouth-watering perogies and cabbage rolls commonly associated with Ukrainian cooking, so I had to search out a few new, fast, and easy recipes to satisfy my cravings. This Chicken Paprikash has nearly no prep, so it was the perfect dinner in a flash. Use the sour cream as suggested for a creamier flavor or leave it out altogether if you prefer to experience the full paprika spice experience.

Ukrainian Chicken Paprikash

Ingredients

  • 3 large onions sliced into half circles
  • 3 cloves of garlic (or more if you like!)
  • 3 chicken breast halves
  • 1/4 cup butter
  • 2 tbsp Paprika
  • 1/2 cup rose wine
  • 1/2 cup sour cream
  • 1/2 tsp sugar
  • Salt and pepper as you choose

Directions

So easy!

  1. Melt the butter, add the onions and sauté until the onion are tender and transparent.
  2. Sprinkle in the delicious paprika, yummy garlic, stir to coat and sauté one minute more.
  3. Toss in some salt and pepper and your wine. Stir and move the onion mixture to one side of the pan.
  4. Grab those chickens and give them a few rounds with the meat mallet and toss them into the empty side of the pan. Cover the chicken with your colourful onion mixture and cook for 10 minutes. Flip and repeat.
  5. When the chicken has cooked for about twenty minutes, remove the onions, add the sour cream and serve with pasta, rice or for a delicious texture twist, try it a top a hot mound of gnocchi. Delish!

Serve with beets for an especially authentic Ukrainian feast.

Gorgeous onions.

Full of colour!

Mushroom and Eggplant Polenta Lasagna

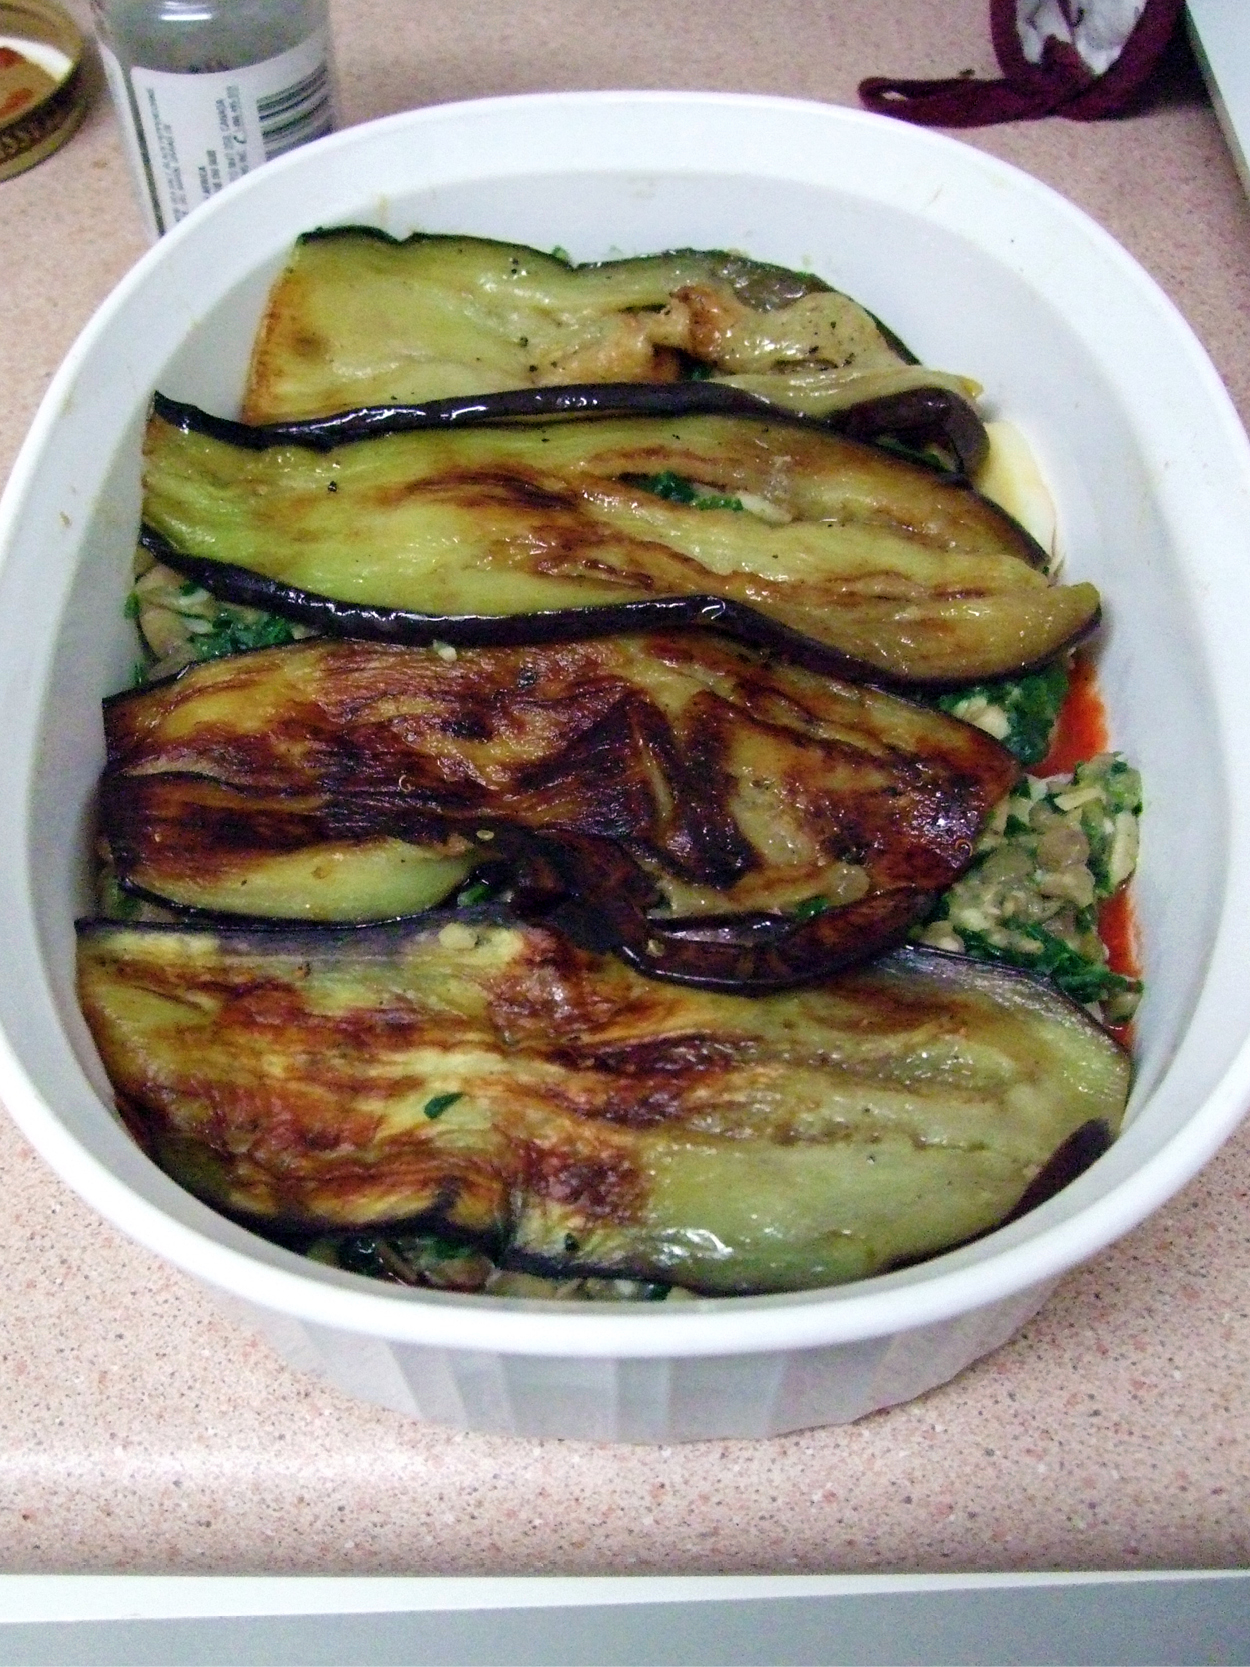
This lasagna was adapted from a recipe sent to me by my lovely friend, Chloë (check out her blog here, it is not food-related but speaks volumes of her awesomeness). I’ve included her recipe at the bottom because it is delicious, but I’ve unveganized it with cheese, switched the tofu for lentils, amped up the mushrooms, and made some personal changes as Chloë suggested. The polenta replaces the noodles in the dish, which is a delicious trick (my mom is uneasy about this switch). It was delicious, and still is delicious, as this made a lot! Mushrooms come in and out of my favour and this recipe placed them firmly back in my heart. Enjoy!

Mushroom & Eggplant Polenta Lasagna

Ingredients

Polenta

  • 6 cups water
  • 1 tsp salt
  • 2 cups yellow cornmeal
  • 3 tablespoons butter

Lasagna layers

  • 2 eggplants sliced length-wise in medium-thin strips (see picture)
  • 2.5 cups of pasta sauce (I used a roasted portobello tomato pasta sauce for the full mushroom effect)

Filling

  • 10 large white mushrooms, sliced
  • 3 tsp chopped garlic
  • 2 tbsp water
  • 4 cups of fresh spinach
  • 3 cups cooked lentils (want some meat in your life? 1 lb of browned ground beef can go here, but it is totally unnecessary as the meat isn’t missed in this dish)
  • 2 1/2 cups of shredded mozzarella (or italian mixed white cheeses)
  • salt and pepper to taste
  • olive oil

Directions

  1. Make the polenta (REQUIRES SETTING TIME). Bring 6 cups of water to a boil in a large pan. Add 2 teaspoons of salt and whisk in the cornmeal in 3 parts, keep whisking to avoid clumping. Turn the heat to low, and, stirring often, cook until the mixture thickens and the cornmeal is tender, about 15 minutes. Turn off the heat, add the butter, and stir until melted. Pour the polenta into a 9 x 13 dish and smooth the top. Allow it to cool in the refrigerator for at least an hour, preferably longer (ooooooor buy polenta at any grocery store).
  2. Cut polenta into strips, vary the thickness according to preference, I left mine pretty thick, about 1/2 inch.
  3. In a large pan over medium-high heat sauté the eggplant strips in batches of 3 until the eggplant browns, set the strips aside.

    I am not a huge fan of eggplant but it was delightful in this dish.

  4. Sauté the mushrooms, spinach, and garlic over medium heat with a bit of olive oil and the 2 tbsp of water until tender.

    Mushroom heaven.

  5. In a medium bowl mash the lentils and 1/2 cup of cheese. Add the spinach/lentil mixture to the spinach and mushrooms. Combine well, salt and pepper to taste, and remove from heat.
  6. Preheat the oven to 375 degrees. Grab a 9 x 12 inch pan… maybe even the one you made the polenta in… huzzah! Or, as I did, grab two smaller but very deep casserole dishes. Also, cover a cookiesheet in aluminum foil… trust me.
  7. Spread about 1/4 of the sauce in the bottom of the pan. Place a layer of polenta strips over the sauce, leaving a little space in between them. Drop half of the filling onto the polenta and spread to cover. Cover with half of the eggplant strips. Spread another third of the sauce over it all and sprinkle with 1 cup of the cheese. Cover with another layer of polenta, filling, eggplant, and cheese. This should use all of your ingredients… if not you’ve done something terribly wrong.

    Layering like a champ.

  8. Cover the dish tightly with foil, place it on the middle rack and the cookie sheet directly below to catch drips. Bake covered for 30 minutes. After 30 minutes, remove the foil and cook for another 20 minutes (50 minutes total). Let stand a few minutes before serving.

Chloë’s original recipe here:

Vegan Polenta Lasagna with Eggplant, Spinach, Mushrooms, and Tofu

Ingredients:

Polenta:

  • 2 cups cornmeal / corn grits
  • 1/2 tsp. salt
  • 6 cups water

Lasagna:

  • 1 eggplant / aubergine, cut into long thin strips
  • 1–3 tsp. chopped garlic
  • 1 jar of pasta sauce (tomato sauce)
  • Sliced black olives (optional)

Filling:

  • 3–6 white mushrooms, sliced
  • 2 tbsp. water
  • 10 oz frozen chopped spinach, mostly but not completely thawed
  • 1 package / 1 cup tofu (firm or medium firm)
  • 2–4 tbsp. nutritional yeast (adds a cheesy taste)
  • 1 tsp. salt (optional)

Instructions:

  1. Make polenta. (This can be done a day or two in advance.) In a large saucepan, bring water and salt to boil over high heat; gradually pour in cornmeal, stirring constantly. Reduce heat and simmer, stirring frequently, for 10 to 15 minutes or until smooth and thickened enough to mound on spoon. Transfer to greased 13 x 9-inch (3 L) baking dish, smooth top and set aside to set. (If making ahead, keep covered in fridge until needed.)
  2. Turn polenta out onto chopping board; with long knife, cut horizontally into strips (as thin as you can cut without it falling apart – about 1/3 of an inch).
  3. Brown eggplant strips in fry pan with cooking spray or a very little bit of oil.
  4. Sauté mushrooms and garlic over medium heat in the 2 tbsp. water until tender; cover between stirring to keep them from drying out.
  5. Place the tofu and thawed spinach in the food processor and process briefly, OR mix them together in a medium-sized bowl with a potato masher or strong fork (or with your hands, but it might be cold because the spinach shouldn’t be entirely thawed). Add the remaining filling ingredients and mix until smooth. Add the mushroom/garlic mixture.
  6. Preheat the oven to 375 degrees.
  7. Make layers. Spread about a third of the sauce in the bottom of a 9×12-inch pan (casserole/lasagna dish). Place a layer of polenta strips over the sauce, leaving a little space in between them. Spread half of the tofu mixture on the noodles (I drop it by spoonfuls and then spread it). Add a layer of eggplant strips next. Spread another third of the sauce over it all. Cover with another layer of polenta, tofu mixture, and eggplant. Keep making layers until the pan is nearly full, then pour the remaining sauce over this. Sprinkle sliced black olives on top.
  8. Cover the dish tightly with foil, and bake for 1 hour (30 minutes with foil covering, then another 30 without the foil). Let stand a few minutes before serving.

Super Simple Black Beans and Ham

When Genesis and I first started dating he actually cooked for me quite often, mostly because we spent most of our time at his apartment. His fare is nothing fancy, but it is usually delicious. One thing he often made for me was lentil soup. It was literally just lentils, water, and salt. And it was surprisingly delicious. It wasn’t until we were living together that he made me his black beans and ham. Again, super simple for something outrageously delicious. He’s tried to change it over the years but I still love the original, with a little spice added.

Simple Black Beans and Ham

Ingredients (by Gen’s best estimate. These take about an hour to cook but you need to soak the beans overnight)

  • 4-5 cups of dry black beans
  • 1 1/2 tsp salt
  • 1/2 tsp black pepper
  • 1-2 tbsp of red chili flakes
  • 3 cups of cubed ham (not honey ham)
  • optional: 4 cloves of garlic
  • water
  • plain greek yogurt or sour cream

Directions

  1. THE NIGHT BEFORE! Rinse beans thoroughly. Place in a large pot (the one you will cook them in the next day) and fill the pot with water. Soak beans overnight.
  2. The night you want to eat! Add the salt, ham, pepper, chili flakes, and garlic (if using) to the pot and add enough water to cover everything by about 2 inches.
  3. Cook covered over medium-low heat for about 1 hour until the beans are soft but not mushy. *Gen would like to interject that HE likes the beans softer than I do so feel free to cook longer, to taste.
  4. Top with a dollop of yogurt, salt and pepper to taste. Eat.

Ready to eat!

Green Curry Bowls

This was the curry that I made all the time before I discovered my Amazing Curry. Gen used to demand I make it whenever guests came over. It started with chicken, then tofu, then beef. It is adjustable, simple, and easy. It starts with a protein, coconut milk, and green curry paste (I use Cock Brand…). It is so simple and can have any veggies added to it. I typically add broccoli, green beans, red and/or yellow peppers, and a squirt of lime. But I’ve definitely tried brussels sprouts, potatoes, green peppers, carrots, cabbage, asparagus, etc. It is versatile.

Green curry delight.

I am going to give you the base for this curry and you should feel free to adjust as desired. It is an awesome, easy recipe.

Green Curry

Ingredients

  • 2 cans coconut milk
  • 2 chicken breasts cubed /or/ 1.5 lbs cubed beef /or/ 1 block of firm tofu cubed
  • 1-2 tbsp green curry paste (Cock Brand or whatever you prefer)
  • 2 heads of broccoli chopped
  • 1 large pepper chopped
  • 1 large leek, white part only, sliced
  • 3 fresh basil leaves
  • 1 lime
  • quinoa

Directions

Getting ready to cook. That's the good curry paste there. Leeks for life!

  1. Cube your protein, brown in a large pot with some coconut oil or other favourite oil. Add a tbsp of curry paste to start.
  2. Pour in your two cans of coconut milk.
  3. Chop your veggies, rinse the leek clean.

Ready for the pot!

4. Add the leeks and broccoli to the meat and coconut milk. These two take the longest to cook. (If you are using other veggies, make a call on how quickly they will cook through and time them accordingly) ALSO: At this point taste the curry to see if you need to add another spoon or two of curry paste. We worked ourselves up from 1 tbsp to almost 3 over the years.

First round of veggies.

5. Cook for about 5 minutes, until broccoli is tender-crisp. Add basil and peppers and allow to cook for a couple of minutes.

6. Serve over quinoa, rice, steamed veggies, etc. with a squeeze of lime.

Yummy.