Seared Scallops on Quinoa Risotto

Oh yes, this is an amazing dinner. I could bathe in this risotto and use the scallops for pillows. This recipe doesn’t make quite that much, but it happily filled our bellies and left more lunch tomorrow, huzzah! I bought the scallops weeks ago in anticipation of this meal but just hadn’t had a chance to gather the rest of the ingredients. The final touch was a batch of fiddleheads, which I have heard of, seen, but have never made. I used quinoa for this risotto because we have a lot of it on hand and I thought it would be something unique, and it worked perfectly.

Gen’s quote, “It was tasty and cheesy, I liked the cheesiness and the fiddleheads. I liked the lemon zest, could’ve even used more. Make it again please!” It’s true, I used less lemon zest then intended, largely because I don’t have a zester and I had to make do, but also because I am hesitant about citrus in savoury dishes… well it ROCKED in this dish, so yes, there will be more zest next time, because I am definitely making this again!

Quinoa Fiddlehead Risotto

Adapted from this lovely Vogue recipe.

Ingredients

  • 1 cup of quinoa, rinsed
  • 3 tbsp of butter
  • 1 large onion (I used yellow, but any colour will work)
  • 4 cloves garlic, pressed
  • 1 cup of white wine
  • 1-1.5 litres of homemade chicken stock (or vegetables stock)
  • 1 1/4 cup of fiddleheads (one package at 10oz)
    • Alternatively/also you can use asparagus
  • 1 cup of frozen peas
  • 2 cups grated parmesan (throw the rind in during cooking for extra flavour)
  • 1 lemon’s worth of zest and juice (wash the lemon to remove any wax)
  • salt and pepper to taste
  • 1/4 tsp dried oregano
  • 3 chives or any green herbs roughly chopped

Directions

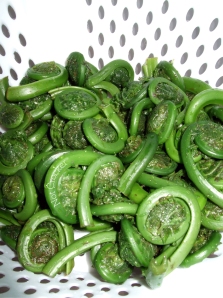
  1. Thoroughly wash fiddleheads with cold water (at least three times) removing as much of the brown papery stuff as possible. Trim the ends. Bowl a pot of water and add the fiddleheads, boil for 15 minutes. Drain and rinse. (Do not be alarmed if the boiling water is dark brown, it is not to keep, chuck it)

    Rinsed and ready to cook.

  2. While the fiddleheads boil, pour the chicken stock into a saucepan, bring to a boil and keep at a low simmer, lid on.
  3. In a separate, large, wide pan, heat a tbsp of butter over medium heat. Add the boiled fiddleheads, season with salt and pepper and sauté for 5 minutes, set aside.
  4. Heat up the last 2 tbsp of butter and gently fry the chopped onion for a few minutes until soft and translucent.
  5. Add the garlic and the rinsed quinoa and stir well for a minute until the quinoa is thoroughly coated in the butter.
  6. Add your white wine and stir to deglaze the pan.
  7. Add a ladle of your hot stock to your pan, stir until it begins to be absorbed by the quinoa. Continue adding 2 or 3 ladles of stock to the quinoa as it absorbs it, unlike rice risotto, the quinoa is forgiving and you don’t have to watch it constantly.
  8. The original recipe suggested that the risotto would be close to done in 8 minutes, mine took closer to 15-20. I started testing the tenderness at about 10 minutes and made judgements from there. Once your quinoa is close to done (almost tender) add in the fiddleheads and the peas, stir them in gently.
  9. About now you will want to start your scallops, they are quick but it is good to have both parts of the dish ready to go at once.
  10. Turn off the heat after a few minutes, you may have stock left over (I had a couple of cups worth), you can add more if you want a soupier risotto.
  11. Stir through your grated cheese, herbs, lemon zest, lemon juice, and salt and pepper to taste.

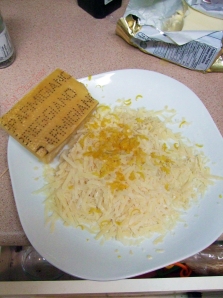
    Grated parm and zested lemon, ready for the risotto.

    Adjust as necessary.

  12. Top with extra fiddleheads if you thought ahead for presentation purposes… I clearly didn’t. Sprinkle with chives.

Seared Scallops

Ingredients

  • 12 large scallops
  • 2 tsp butter
  • 1 tsp of olive oil
  • salt and pepper

Directions

  1. Pat the scallops dry, salt and pepper both sides.
  2. Put the butter and oil in a large pan over high heat.
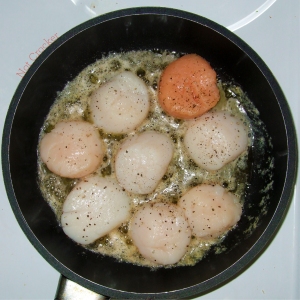
  3. When the oil begins to smoke add the scallops, placing them evenly in the pan.

    Lovely large scallops searing away.

  4. Cook for 1 1/2 minutes on each side. When you flip them, they should’ve formed a brown crust.
  5. They are done when they are slightly firm, and opaque on the ends.
    If you over cook them, they will be tough, be careful!
  6. Plop these on top of a pile of risotto.

Creamy, rich, fresh.

Yogurt Coffee Cake Muffins

Another mouthful for a title but oh so worth it. These muffins were inspired by laziness. I had already planned to bake coffee cake this weekend but decided this morning that I really didn’t want to bake a pan of coffee cake, have to cut it and store it and figure all that out. Muffins are easier to manage, I can eat two or three and Gen can’t tell how much I’ve eaten… fool proof plan. These are light and fluffy with a bit of a crunch, and a golden top that cries to be save until the end (Seinfeld knew what was up with the whole Top of the Muffin thing).

Yogurt Coffee Cake Muffins

Adapted from this lovely cookbook.

Ingredients

Crumb top

  • 3/4 cup all-purpose flour
  • 3/4 cup firmly-packed dark brown sugar
  • 1/2 tsp salt
  • 1 cup toasted walnuts (place on baking sheet in a 375° for 5-10 minutes, until they start to brown)
  • 6 tbs unsalted butter, cold, cut into 1″  cubes

Chocolate sugar ribbon

  • 1/2 cup dark brown sugar
  • 1 tsp cocoa powder
  • 1/2 tsp cinnamon
  • 1/4 tsp cardamom
  • 1/4 tsp nutmeg

Cake

  • 1 cup butter, softened (not melted)
  • 2 1/4 cups sugar
  • 4 large eggs
  • 2 cups of plain yogurt
  • 1 1/2 tsp vanilla
  • 3 1/2 cups  all-purpose flour
  • 1 tsp baking powder
  • 1 1/2 tsp baking soda
  • 1/2 tsp salt

Directions

  1. Crumb top prep: Whisk together the flour, sugar, and salt. Add the toasted walnuts and, using a pastry cutter, chop the walnuts into the flour mixture until they are well incorporated and in pea-sized pieces. Add the butter, again using the pastry cutter, cut the butter into the mixture until everything is finely chopped, resembling coarse sand. Cover with plastic wrap and set aside in the refrigerator.
  2. Sugar ribbon prep: In a small bowl, whisk together the sugar, cocoa powder, cinnamon, cardamom, and nutmeg and set aside.
  1. Preheat the oven to 350 degrees F. Line or grease muffin tins. (This made 24 muffins exactly, I only have one tin so I had to put them in twice.)
  2. In a large bowl, cream the butter until smooth. Scrape down the sides and add the sugar. Mix until smooth and starts to look fluffy.  Add the eggs, one at a time, mixing well after each and scraping the sides as needed.
  3. Add the yogurt and vanilla and mix until just incorporated. Whisk together the flour, baking powder, baking soda, and salt. Add the flour mixture in three parts until just incorporated. Be careful not to overmix.

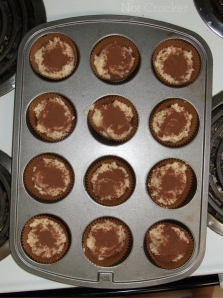
    Swirl layer.

  4. Drop one tablespoon of batter into each cup.  Cover with a tsp (or more) of the sugar ribbon mixture.
  5. Drop a heaping tablespoon of batter on top of the sugar ribbon layer and smooth as best you can. Top with the crumb topping and press down into the batter. Don’t be afraid to use a lot of topping, you wan to use it all.
  6. Bake for 20-25 minutes, until golden brown or a toothpick inserted in the center comes out clean. Let cool on a wire rack.

All the mixins ready to layer!

Ribbon of goodness.

Creamy Herb and Tomato, Sausage Sauce

Well this is something I have made a couple times in a couple of different ways, and I’ve tried to capture my process in recipe form. I happened to have some delicious sausage on hand and wanted to make something to top my shell pasta that wasn’t your standard sauce, so this recipe was born. It is easy, adaptable, and full of flavour.
Also, I promise I will do a lovely baking post for Sunday, because what is better on a Sunday than a delicious piece of coffee cake! In the meantime, sausage pasta sauce!

Creamy Herb and Tomato, Sausage Sauce

Ingredients

  • 6 gourmet sausages (I have made this with Rosemary Lamb and Italian Turkey sausage)
  • 6 large white mushrooms, sliced
  • 3 cloves of garlic
  • 1 jar of tomato sauce or pasta sauce (pick your favourite)
  • 1/3 cup of cream
  • 1 tbsp butter
  • 1/4 cup parmesan (I have a big chunk of it in my fridge so I just break off pieces)
  • 1/2 tsp dried rosemary (double if you have fresh)
  • 1/4 tsp dried oregano (double if fresh)
  • 1/4 tsp thyme (double if fresh)
  • salt and pepper to taste

Directions

  1. Place a large pan over medium-high heat (add a tbsp of olive oil if desired). Remove the casings from the sausages and place the meat in the pan, using your spoon to break it up. Cook the sausage until done, about 5-8 minutes. Take out your 1/3 cup of cream and allow it to come to room temperature (this will prevent it from curdling).
  2. Moving the sausage to one side of the pan, add your butter, sliced mushrooms, and garlic. Sauté the mushrooms and garlic for about 5 minutes, stir into the sausage when done.

    Mushrooms added!

  3. Pour in the pasta sauce over the meat and mushrooms. Add your spices. Pour the cream into the sauce, stirring quickly to incorporate. Top with chunks of parmesan, allowing them to melt as you stir them in. Let it simmer over medium heat for 8 minutes. In the meantime, cook your favourite pasta al dente.
  4. Taste and adjust salt and pepper as needed.
  5. Serve over your favourite pasta (SHELLS!).
Also! I served this with my beer bread, to which I added 3/4 cup of shredded cheddar. Perfect!

Cheese added.

Cream-Braised Brussels Sprouts

I came across this recipe after Genesis had been sautéing brussels sprouts for weeks and I wanted something new. I am not sure if this is an endorsement for anyone else but when Gen first had this he LOVED them and then asked me what kind of cheese I used on them (none… there was none… he is strange). I have had to alter the recipe to suite my needs/ items on hand. Initially I used fresh sprouts, then they became difficult to source (at least good ones were difficult to hunt down) so I started using frozen sprouts, and voila, works both ways! I have also swapped out the lemon juice for lime in a pinch. These brussels sprouts are lightly caramelized, creamy, rich, and the perfect side (or plateful). I am proud to say that my mom has called me a number of times asking for MY help with these, my parents love them! The recipe is from this lovely blog, Orangette, and it will be a recipe in my family forever.

Cream-Braised Brussels Sprouts

From here.

Ingredients

  • 1 ¼ lb brussels sprouts (about 5-6 cups… they take up a lot of space)
  • 3 tbsp butter
  • ¼ tsp coarse sea salt, plus more to taste
  • 1 cup heavy cream (more if needed to cover)
  • 1 tbsp fresh lemon juice, or more to taste

Directions

  1. First, prep the brussels sprouts. Trim the stem end of each sprout and pull off any ragged or nasty outer leaves. Cut the sprouts in half from stem end to tip. If using frozen sprouts, you wont cut them, they’ll caramelize well enough whole, and still be delicious.

    Brussels all cut, and ready to caramelize.


  2. In a large skillet, melt the butter over medium-high heat. Add the brussels sprouts and salt. Cook, stirring occasionally, until the sprouts are nicely browned in spots, about 5 minutes or so. Don’t skip this step, this adds a rich depth of flavour that is nicely balanced by the cream and the lemon.
  3. Pour in the cream to just about cover the sprouts, stir to mix, and then cover the pot. Reduce the heat to low or medium low: you want to keep the pan at a slow simmer. Braise until the sprouts are tender enough to be pierced easily with the tip of a paring knife, about 20 minutes. The cream will have reduced some and will have taken on a creamy tan color.
  4. Remove the lid, and stir in the lemon juice. Taste for seasoning, and adjust as necessary. Let the pan simmer, uncovered, for a minute or two to thicken the cream to a glaze that loosely coats the sprouts. Serve immediately with steak, pork chops, tofurkey, anything you want!

    On their way.

Ukrainian Chicken Paprikash

Being one quarter Ukrainian, every once in awhile I get the urge to “get back to my roots” and cook up some delicious Ukrainian fare. As a non-mommy, it was a lot easier to commit the time needed to create the mouth-watering perogies and cabbage rolls commonly associated with Ukrainian cooking, so I had to search out a few new, fast, and easy recipes to satisfy my cravings. This Chicken Paprikash has nearly no prep, so it was the perfect dinner in a flash. Use the sour cream as suggested for a creamier flavor or leave it out altogether if you prefer to experience the full paprika spice experience.

Ukrainian Chicken Paprikash

Ingredients

  • 3 large onions sliced into half circles
  • 3 cloves of garlic (or more if you like!)
  • 3 chicken breast halves
  • 1/4 cup butter
  • 2 tbsp Paprika
  • 1/2 cup rose wine
  • 1/2 cup sour cream
  • 1/2 tsp sugar
  • Salt and pepper as you choose

Directions

So easy!

  1. Melt the butter, add the onions and sauté until the onion are tender and transparent.
  2. Sprinkle in the delicious paprika, yummy garlic, stir to coat and sauté one minute more.
  3. Toss in some salt and pepper and your wine. Stir and move the onion mixture to one side of the pan.
  4. Grab those chickens and give them a few rounds with the meat mallet and toss them into the empty side of the pan. Cover the chicken with your colourful onion mixture and cook for 10 minutes. Flip and repeat.
  5. When the chicken has cooked for about twenty minutes, remove the onions, add the sour cream and serve with pasta, rice or for a delicious texture twist, try it a top a hot mound of gnocchi. Delish!

Serve with beets for an especially authentic Ukrainian feast.

Gorgeous onions.

Full of colour!